Friday, October 31, 2014

My Hopeful Halloween

I'll never forget Halloween of 2012, two years ago today.  After letting Luke answer the door and hand out candy (he didn't want to go trick-or-treating yet...hadn't figured out the fun), I went to the bathroom to take a pregnancy test.  I didn't want to get my hopes up, but I was a few days late, and it was time to see.

Positive.  Tried not to get overly excited.  Wasn't sure when or how to tell Matt, because I knew he would panic a little.  EXACTLY two years prior to that, we found out we were pregnant with our second baby, who we lost at eleven weeks on Christmas day of 2010.  When you go through something like that, fear and doubt creep in.  It's harder to enjoy the next pregnancy, because you are so scared that something is going to go wrong.  I showed the test to Matt, and he was cautiously optimistic.  Emphasis on the "cautious" part.  I remember he ran to the store to buy 2 more "expensive" pregnancy tests, to be sure.  Got some smiley faces that confirmed it.

I remember crying in the shower, praying for God to let us keep this baby.  It was happy/sad/gut wrenching cry.  Ugly cry.  But cleansing.  And the kind of prayer where your thoughts are not clear, but you know God understands what you're saying.  We had a few scares along the way, but delivered our precious Elizabeth 7 1/2 months later, happy and healthy.  She has been a joy ever since, and fills our house with love every day.  And not a Halloween will go by that I won't remember the day we found out she would be in our lives.  So blessed and grateful.  Stay hopeful, friends.

Wednesday, October 8, 2014

Paleo Pumpkin Bars

It was officially time to unleash the pumpkin beast at our house this week.  It's not really cool outside yet, but it was time.  First up...Paleo Pumpkin Bars.  I have made healthy pumpkin bars before with an almond butter base.  They were very tasty, but very heavy and caloric.  Kinda sat like a brick in your stomach if you had more than one little guy.  I have also made some tasty pumpkin muffins that were a hit, but sometimes I just want something easier.  Who has time to measure out batter into a muffin tin?  (well, I sometimes do...but not this week!!)

These are fabulous.  They are very creamy like pumpkin pie filling, but kinda cake-y, and totally feel like you're cheating on your healthy diet.  But you're not!  And the kids both LOVED them.  They have been Luke's after school snack all week. 

Anyway, this is a dump, mix, spread, bake, eat recipe.  Super simple, and we will be making it again.  Probably tomorrow.  I was determined to use an entire can of pumpkin for the recipe.  I really despise opening a can of pumpkin, taking out half, then getting tupperware dirty to store the rest, which I will inevitably forget to use.  So, I get to throw it out later AND wash more tupperware.  YAY!  I digress.

I used the smallest amount of sweetener I thought we could deal with, and I think it was just right.  I'm sure my father would disagree, but he would be wrong.  That being said, you can experiment if they are not sweet enough for you.  I think they tasted sweeter chilled the next day, which incidentally, I liked better!  We put the chocolate chips on top, as a last minute "oh yeah, that would be awesome" kind of thing.  I think they would be better mixed in, or at least pressed into the batter.  They kinda fell off the top of the bars. Didn't stop us from eating them all, though.

Ingredients
15 oz. pumpkin puree (about 1 1/2 cups, for you crazy people using fresh pumpkin puree)
3/4 cup coconut flour
3/8 cup honey (6 tablespoons)
1 1/2 teaspoons ground cinnamon
1 teaspoon pumpkin pie spice
3/4 teaspoon baking soda
1/4 teaspoon salt
2 large eggs
Handful of chocolate chips (yeah...didn't measure, but I'm guessing about 1/4 cup)
Coconut oil, for greasing the pan

Directions
Preheat the oven to 350F and grease a 8"x8" (or 9"x9") baking dish with coconut oil. Combine all of the ingredients in a large mixing bowl, and stir well until no clumps remain. Transfer the batter to the greased baking dish, and use a spatula to smooth the top.  Bake for 40-45 minutes until the edges are start to brown and the center is firm.
 

Smooth it out

You missed a spot, Mom.

Wish you could smell this...

Slice, and gobble them up.


Friday, September 26, 2014

Adventures in Homemade Mayonnaise

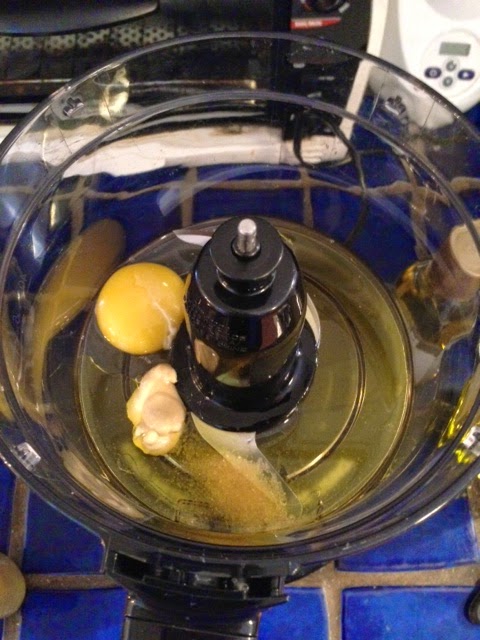
This is something I have wanted to try for a while, but just kept forgetting to do.  It takes so few ingredients, and is so versatile...and I finally got around to it!  Here's what's in it:


Pardon the ridiculous lemon juice container.  I almost always have real lemons at the house, or at least some frozen juice from fresh lemons.  But, we just got back from vacation, and this was all I had.  You can use any kind of oil you want, but try something light tasting.  I used half olive oil and half avocado oil, and it was a little heavy on the olive oil flavor.  I think I might try just avocado oil next time, or make sure to get a lighter tasting olive oil. 

Some of the recipes I came across wanted all the ingredients to be at room temp.  I put the egg in some warm water for a couple of minutes, and that worked great.  I used a food processor for this, but an immersion blender would be even better, if you have one.  You start with the egg, 1/4 cup of oil, 1/4 tsp salt, 1 tablespoon dijon mustard in the food processor.  Mix thoroughly.


Once you have that well blended, turn the processor back on, and take the cover off of the top (yes, this can result in specks of liquid spitting out at you....mind yourself).  Then slowly drizzle the remaining 3/4 cup of oil into the mix as it is running.  The slower you go, the thicker it will get.  It's kind of magical.


See how thin the stream is?  That's how slowly I was going.  This part is important.  If you go to fast, you will have salad dressing.


Thick and pretty!  I added the lemon juice LAST. Didn't want to thin it out too much before it all came together.  You can add so many things to this...pepper, spices, cilantro, jalepenos, bacon...pretty much whatever you want.  I went basic for my first attempt.  And it was really good!  And WAY better for you than anything you'll find in the store.  I used this for a version of the baked chicken on Pinterest that everyone pinned like a year ago.  You know the one I'm talking about.  Mayo and parmesan cheese.  I put some mayo on top, and then sprinkled with almond flour and pepper instead.  Very tasty and moist!  Try this!  You'll feel really legit with your skills in the kitchen.


Homemade Mayo


1 large egg
1/4 teaspoon Himalayan Salt (love this kind of salt!)
1 cup oil of choice (avocado or light tasting olive oil)
1 tablespoon Dijon mustard
Juice of 1/2 a lemon (about 1 tablespoon) 


Need help with your health and fitness journey?  Contact me HERE!


Monday, September 8, 2014

Bring on the water

Luke gave me a really sweet gift for Mother's Day a few months back.  It was a little flower in a tiny pot, that has grown to be a much larger plant in a bigger pot now.  It grew on it's own for a while, outside.  Got enough water from the rain. Then, we had to start watering it ourselves, and there was a period where we forgot to water it for a bit, and it didn't look like it was going to make it.  It made Luke sad, of course, since he gave it to me.  Luckily, after we flooded it slightly, it came back.  Can't be the mom who killed the Mother's Day flower.  Such a simple thing.  Give it a little water.  Every day.  Takes less than a minute.  And yet, it's also easy to skip, which we got lazy and did, and then there goes the plant.

How many times does this happen in life?  With your marriage, your kids, your health, your work....it kind of applies everywhere.  Sometimes we get lucky, and rain comes.  But sometimes, there is a drought, and we have to dig deeper to find the water.  The good news is, it's never too late to start watering again.  And you can start yourself - you don't have to wait on your spouse to deserve a hug or your kids to behave before you are more patient with them.  Just do something today to spread light and life.  Does a body good.  Like water.  Stay hopeful, friends.


Saturday, August 30, 2014

The Power of Food

I used to think I ate pretty well.  Mostly paleo, decent amount of veggies, ate out in moderation...nothing too crazy.  I was able to lose the baby weight and maintain that, so I felt like I was doing okay.  Until my skin told me otherwise.  It started with a rash around my mouth and chin - perioral dermatitis.  Made my skin flake and was super annoying.  I was prescribed some antibiotics and a cream from my dermatologist.  The cream did nothing, but the antibiotics held it at bay.  It didn't go away entirely, though, and each time I came off the antibiotics, it would flare.

Then I started having an additional rash on the side of my face any time I went out in the sun.  Even the slightest exposure.  More antibiotics, and now a steroid cream.  Next, I got an itchy rash on my neck, and my left eye started to swell.  Different steroid cream, and steroid eye drops.  The rash on my face was so painful now, it felt like I had a severe sunburn, and I couldn't smile or open my mouth to eat without significant pain.  It hurt to nuzzle my face against my sweet baby's soft head.  It was agony.  And I felt lost.  I didn't want to take antibiotics my whole life, and steroid creams have all sorts of side effects.  It was truly depressing.

I turned to a holistic doctor, who immediately told me to take out all dairy, grains/gluten, and soy.  Basically STRICT paleo.  Pretty dramatic, but I was desperate. Even though I was eating fairly well, there were more cheat meals than I had realized.  I had to take a hard look at every single bite I was eating.  Crust of a sandwich here, handful of cheerios there, piece of pizza or ice cream at a party, cereal and milk for dessert sometimes.  Maybe I wasn't as paleo as I thought.  Plus my daily serving of yogurt that I loved had to go (total paleo cheat, but not unhealthy).  Between my nutrition coaching and Matt's diabetic diet, it wasn't as hard as it would have been for me a few years ago, though.  I knew plenty of alternative recipes, and I was determined to stick to it.

It took three full weeks to start seeing results.  The longest three weeks EVER.  Finally, after a month, I really saw the light at the end of the tunnel.  And I continue to see improvement.  My "normal" eczema, psoriasis and rosacea that I have had for years have all improved as well.  Sometimes I get sad that I'll never have things like pizza again, but with support from my fellow coaches and groups, I know I can do it.  Plus, I have can still vegan chocolate Shakeology for a treat (so glad they have a dairy/gluten/soy free formula...gotta have some chocolate in my life).  It's worth it to be able to snuggle with my baby and not feel pain.  To be able to put on makeup and not have my skin burning and flaking off.  I have SO. MUCH. sympathy and empathy for those dealing with any skin issues now.  It has been one of the most difficult health issues I have had in my life.  And it all stemmed from inflammation in my body from the food I was eating.

I never thought I would share these photos with anyone, let alone a blog, but I want to give hope to those suffering like I was.  Here is my before and after.  No medicine, no antibiotics, no steroids.  All FOOD choices.  The before wasn't even my worst.  Add in a swollen eye, and lots of flaking skin.  These are hard for me to post, y'all.  I don't even like to go to Target without my makeup on.  The first set was taken in the car...sorry for the bad lighting.  Second set was taken today...about 3 months later.


If you are suffering with skin issues, please know you are not alone!!  I would encourage you to try making healthy changes in your diet.  It takes planning and hard work, but it can truly heal your body.  If you don't know where to start,contact me HERE.  I would love to help you get on the right path!  Stay hopeful, my friends!!

Wednesday, August 20, 2014

Healthy Pizza Muffins (say what?!)

It's not even Muffin Monday, but I couldn't wait to share this recipe.  It's based on a low carb pizza crust that I make a lot (how-to video here).  I was brainstorming things to make for Luke to take in his lunch box, and this just came to me.  A pizza muffin vision from above.  I just took the ingredients for the crust, and added in the cheese and toppings, then put it in a silicone muffin pan (this is the kind I have).  Dip them in pizza sauce, and thank me later.  Low carb, high protein, high fiber, grain-free, gluten free, full of healthy fat....oh yes.  They are real.  I give you, the Healthy Pizza Muffin.


Ingredients
3 T butter (or olive oil, or coconut oil)
3 eggs
3/8 cup almond meal
3/8 cup flax meal
3/4 tsp baking powder
3/4 tsp Italian seasoning
1/4 tsp salt (optional, depending on toppings)
3/4 cup shredded mozzarella cheese
Toppings of choice (I used browned Italian sausage crumbles and mini pepperoni)

Directions
1) In a glass pyrex, melt the butter or coconut oil (no need to melt olive oil).
2) Add remaining ingredients, in order.  Just stir 'em all up with a fork.  Kids can help.
3) Pour into silicone muffin pans (makes 12 muffins).
4) Bake at 350 for 20-25 minutes (test to make sure they are done in the middle)

These can be made ahead of time and eaten cold, room temp, or reheated in the toaster oven (yum).  Dip in your favorite pizza sauce.  You're welcome.

Need help with your health and fitness journey?  Contact me HERE!  I would love to work with you!

Saturday, August 9, 2014

Clean and Simple Squash Casserole

YOU GUYS.  This was so yummy.  I had a bunch of yellow squash I needed to use up ASAP, as I underestimated the shelf life of organic summer squash.  It's not super long.  I remembered having squash casserole as a kid, and loving it.  I also remember lots of Ritz and cheese being involved, which are now banned from my diet (I cry).  But really, this was dang good.  So, here you go.  

Slice up 5-6 yellow squash (about 5-6 cups worth).  I did this last night to save time this morning.  Behold my glamorous baggie o'squash.


Preheat your oven to 350.  In a bowl, combine 4 eggs, 4 tablespoons of almond meal (the sub for Ritz), 1 teaspoon of sea salt, 3 tablespoons of milk (I used unsweetened almond milk, to be dairy free), and 1 tablespoon of coconut oil, melted (could use butter or ghee).  

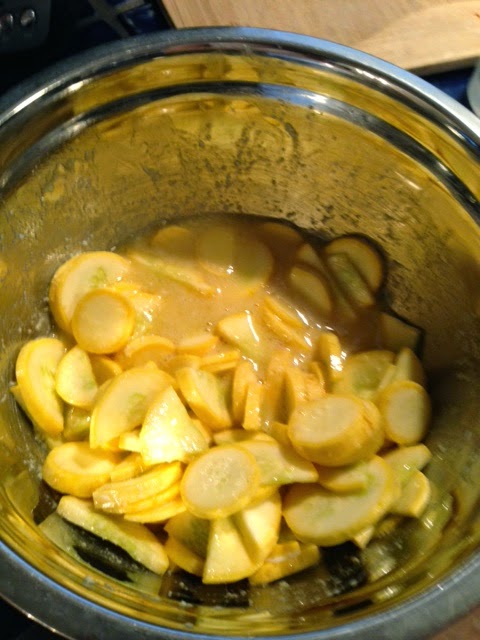
Then toss the squash in the mixture, making sure you coat every piece.  This would be fun for kids (Luke was asleep, bless him).  Then layer the slices in a greased casserole dish.


Once you've placed the last lovely slice of squash, pour the remainder of the egg mixture over the top, and crumble an extra tablespoon of almond meal and a sprinkle of salt and pepper for a crispy crust.


Pop it in the oven at 350 for an hour, and enjoy!!


Ingredients:
5-6 cups yellow squash sliced
4 eggs
4 tbsp. almond meal (plus an extra tbsp for topping)
1 tbsp. coconut oil (or butter)
3 tbsp. almond milk (or regular milk)
1 tsp. sea salt

Optional, but I didn't have on hand: 
Shallots - would be nice sliced thin on top
Fresh chives - would be a pretty garnish!

Directions:

Preheat oven to 350.  Whisk together eggs, almond meal, coconut oil, milk and salt in a large bowl. Add the sliced squash in the mixture and stir to coat all of the squash. Remove the squash from the mixture and begin layering it in a casserole dish that has been greased with coconut oil or butter. Repeat until you have used all of the squash. Pour any remaining egg mixture over the casserole. Sprinkle remaining tablespoon of almond meal, and a dash of salt and pepper on the top of the casserole, and bake for 60 minutes. Leave uncovered to get a nice crust on top.  Garnish with chives, if you so desire :)